If you have a CCTV system, you’ve probably realized that it has one major vulnerability – all the video is stored locally onto the NVR. If something were to happen to the recorder – such as a thief destroying it – you will lose all video footage that was saved on the NVR.
While you can mitigate this by setting up email snapshots, it’s far more effective to have a cloud backup of your video footage.
Third-party Cloud – Monthly Fees & Reduced Quality
A quick Google search reveals a few companies offering third-party cloud storage – such as Videoloft and CameraFTP. Although they may be a good fit for your requirements, there are two reasons why they may not.
First, these companies charge monthly fees that can get expensive very quickly. For example, CameraFTP charges $643 per year for four cameras recorded at 1080p. And that’s if you record at 3 frames per second.
If you want smoother playback, the price jumps to more than $2000 per year for 15fps recording at 1080p!
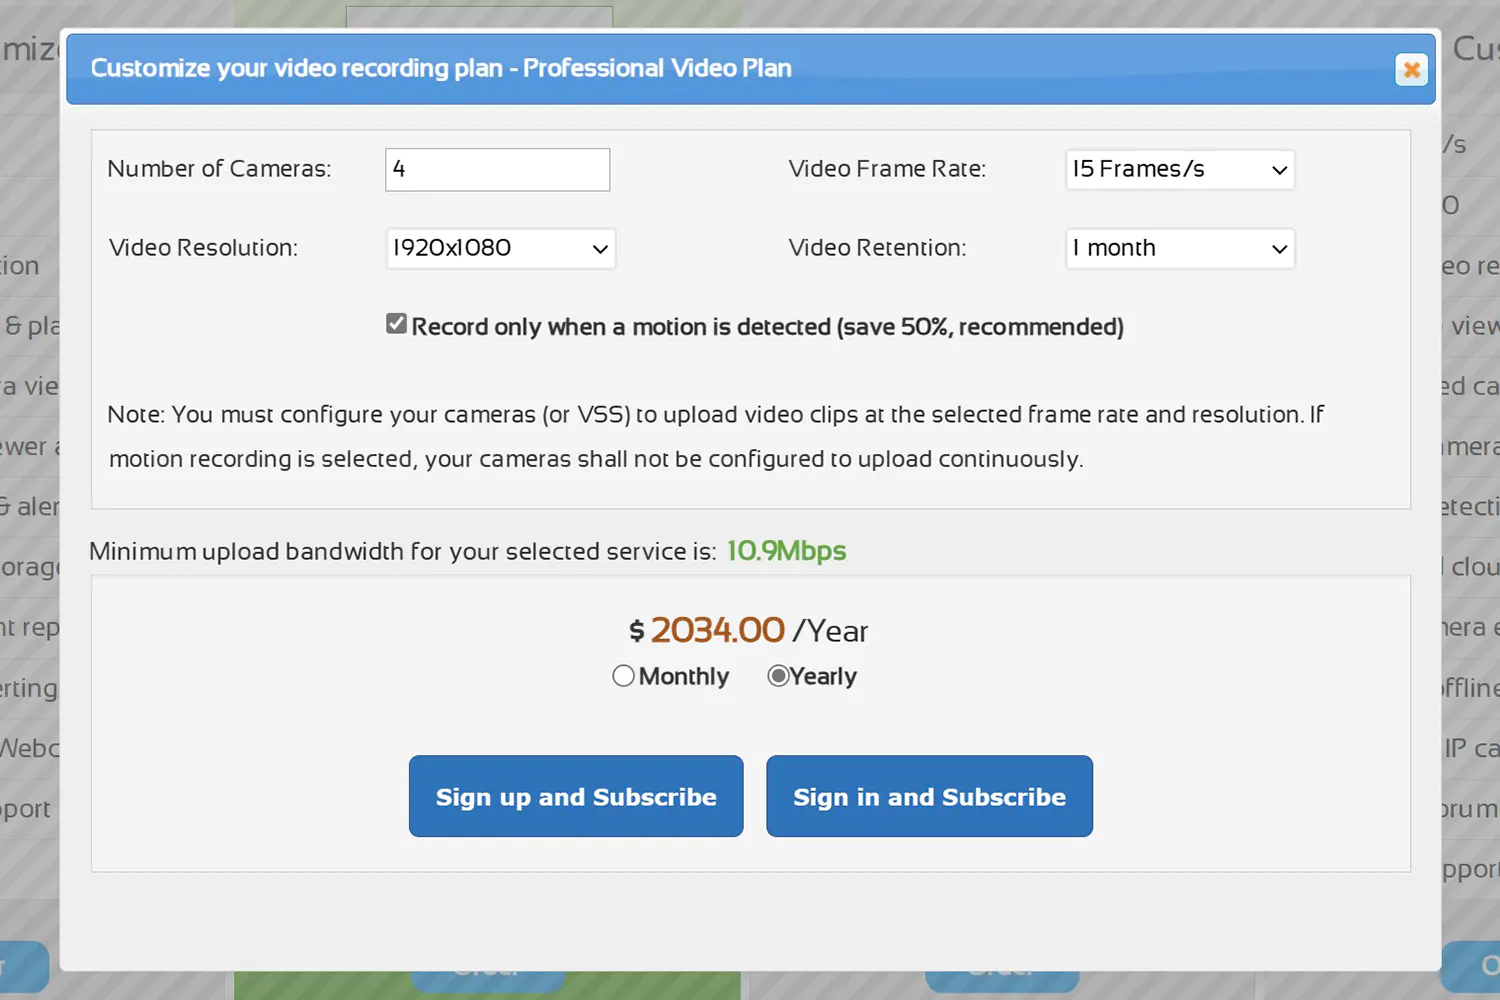
Second, these cloud backup options will compress your camera footage to save space on their servers. For example, Videoloft Specifications reveal that they compress 8MP (4K) cameras down to 1800 Kbps. This is far below our recommendation of ~5000 Kbps for a 4K camera.
Since the footage is compressed, it will look blocky and pixelated. However, if you setup your own cloud storage server, you can adjust the bitrate to your heart’s content. This allows you to store your footage with optimal image quality.
Creating Your Own Cloud Video Backup
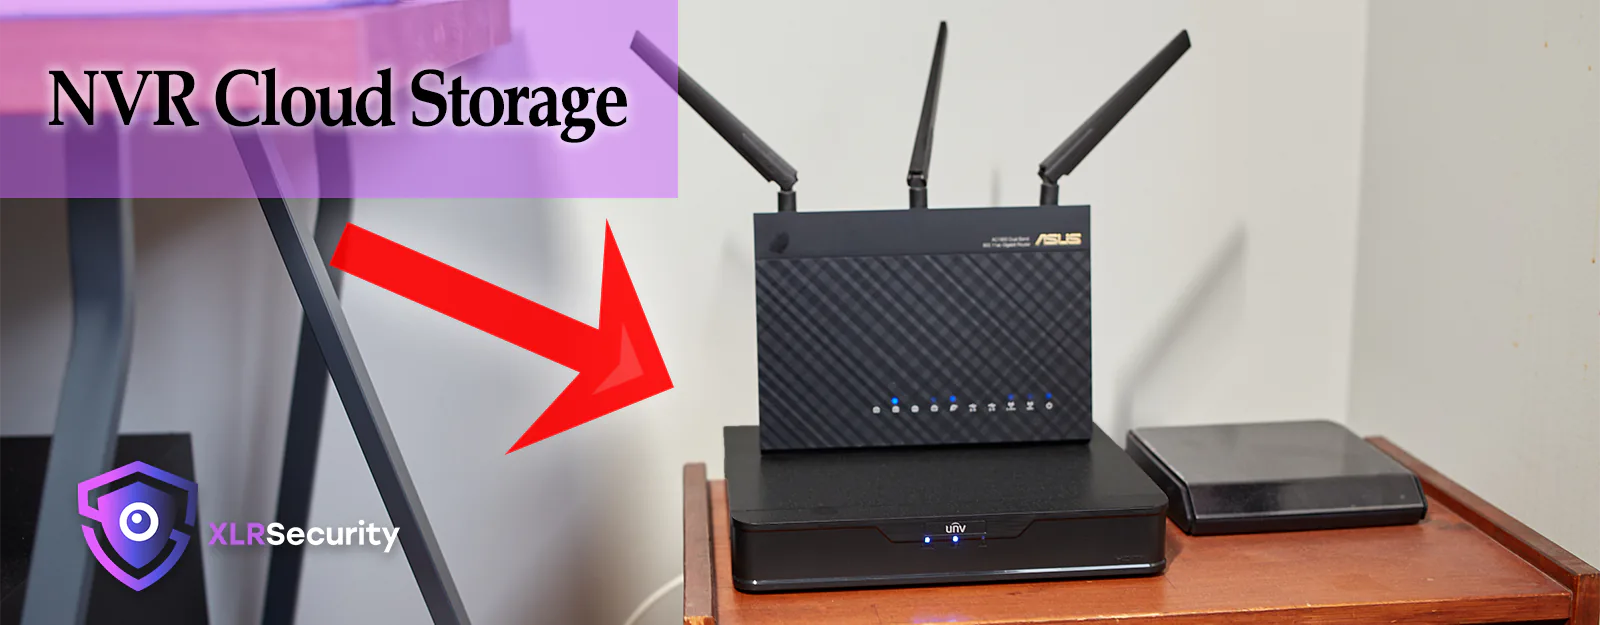
As we’ve seen, subscribing with a third-party company for cloud storage is expensive. A cheaper option is to create your own backup server – by purchasing a 2nd NVR and a hard drive.
In theory, this should work regardless of whether you’re using a Hikvision, Dahua, Reolink, Lorex, or Uniview system. However, your system must use an NVR – this won’t work if you have a wireless system like Wyze or Blink.
Step 1 – Prerequisites and Considerations
Before creating your own cloud server there are a few things to consider:
- Where will you store your backup server? A few ideas are: Friend’s house, office, or storage unit.
- You need fast upload speed at the first NVR and fast download speed at the second NVR. At least 5 Mbps per camera – so 20 Mbps if you’re backing up four cameras.
- How many cameras are you backing up? How long of retention do you need? (consider how many hard drives to get)
After working through these considerations, go ahead and purchase your second NVR along with some hard drives for storage. Make sure you purchase an NVR that supports all your cameras – such as an eight or sixteen channel NVR. You could purchase a smaller capacity NVR, but then you may not be able to backup all channels.
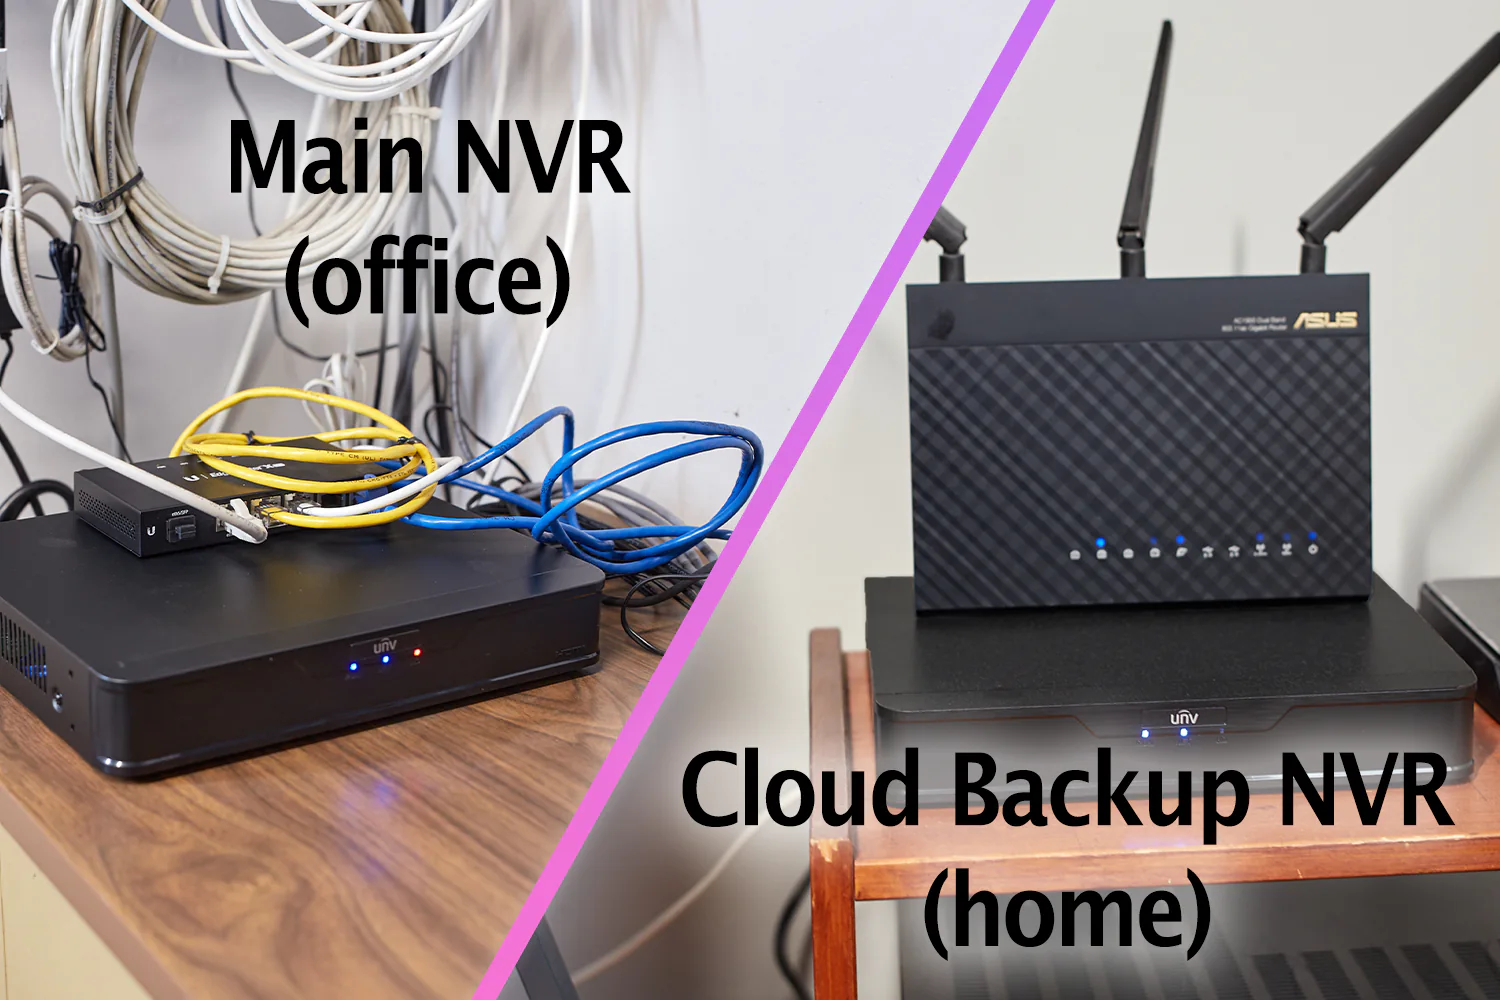
You’ll also want to make sure your backup NVR is in a safe location where it won’t be unplugged or moved accidentally. For example, our main NVR is at the office, while our secondary NVR is at home.
Step 2 – Open HTTP & RTSP Ports on Your Router
The first NVR will backup to the second NVR through the internet. For this to work, you’ll need to open some ports on your router. You could also implement a VPN server on your router (such as an IPSEC VPN Tunnel) which is more secure. However, that’s beyond the scope of this tutorial.
The ports that need to be opened on your router are the HTTP and RTSP ports of your NVR. For some recorders, such as Hikvision, you may also need to open the server port.
I’ve opened ports 80 and 554 on my Uniview NVR to allow traffic to flow out to my second NVR. You do not need to open any ports at the second location.
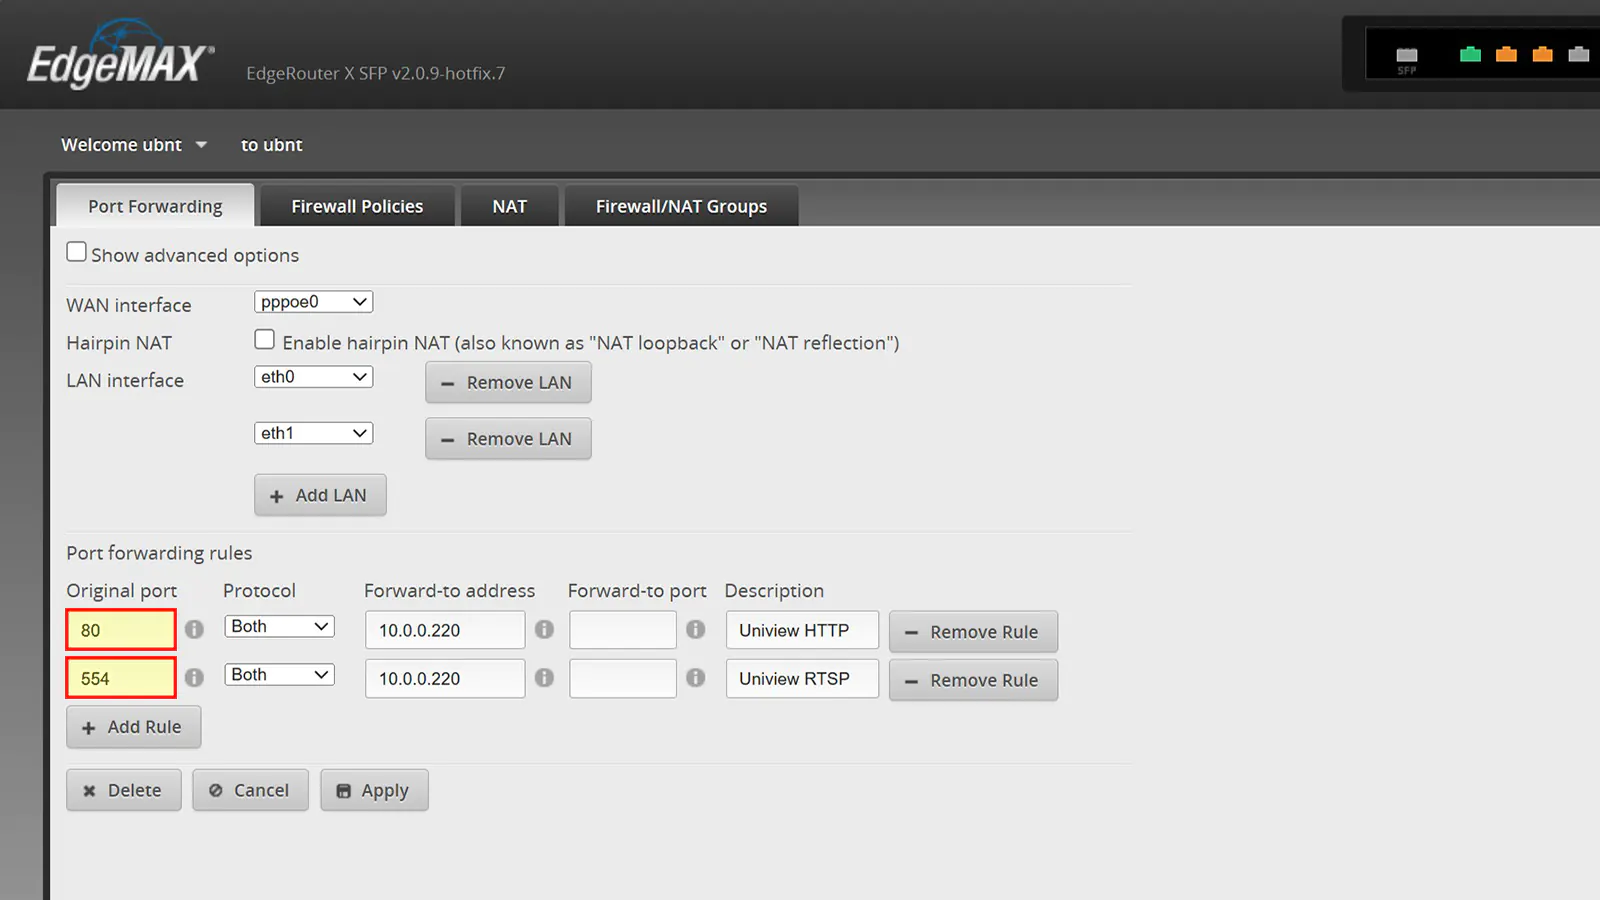
Once you’ve done the port forwarding, you can visit canyouseeme.org and enter the ports to see if they are open. If you see an error message – consult the manual for your NVR and check online for port forwarding tutorials – make sure the ports are open before you proceed.
Also, make sure the traffic is not being blocked by another router or firewall on your network.
Step 3 – Setup the 2nd NVR at the Remote Location
Now that the ports are opened (or you’ve set up a VPN tunnel), you can go ahead and install the second NVR. Make sure it’s connected to power and the internet – then go ahead and login to configure its settings.
Since the exact settings and menus will differ between NVR manufacturers, I’ll show you my settings and explain the reasons behind them.
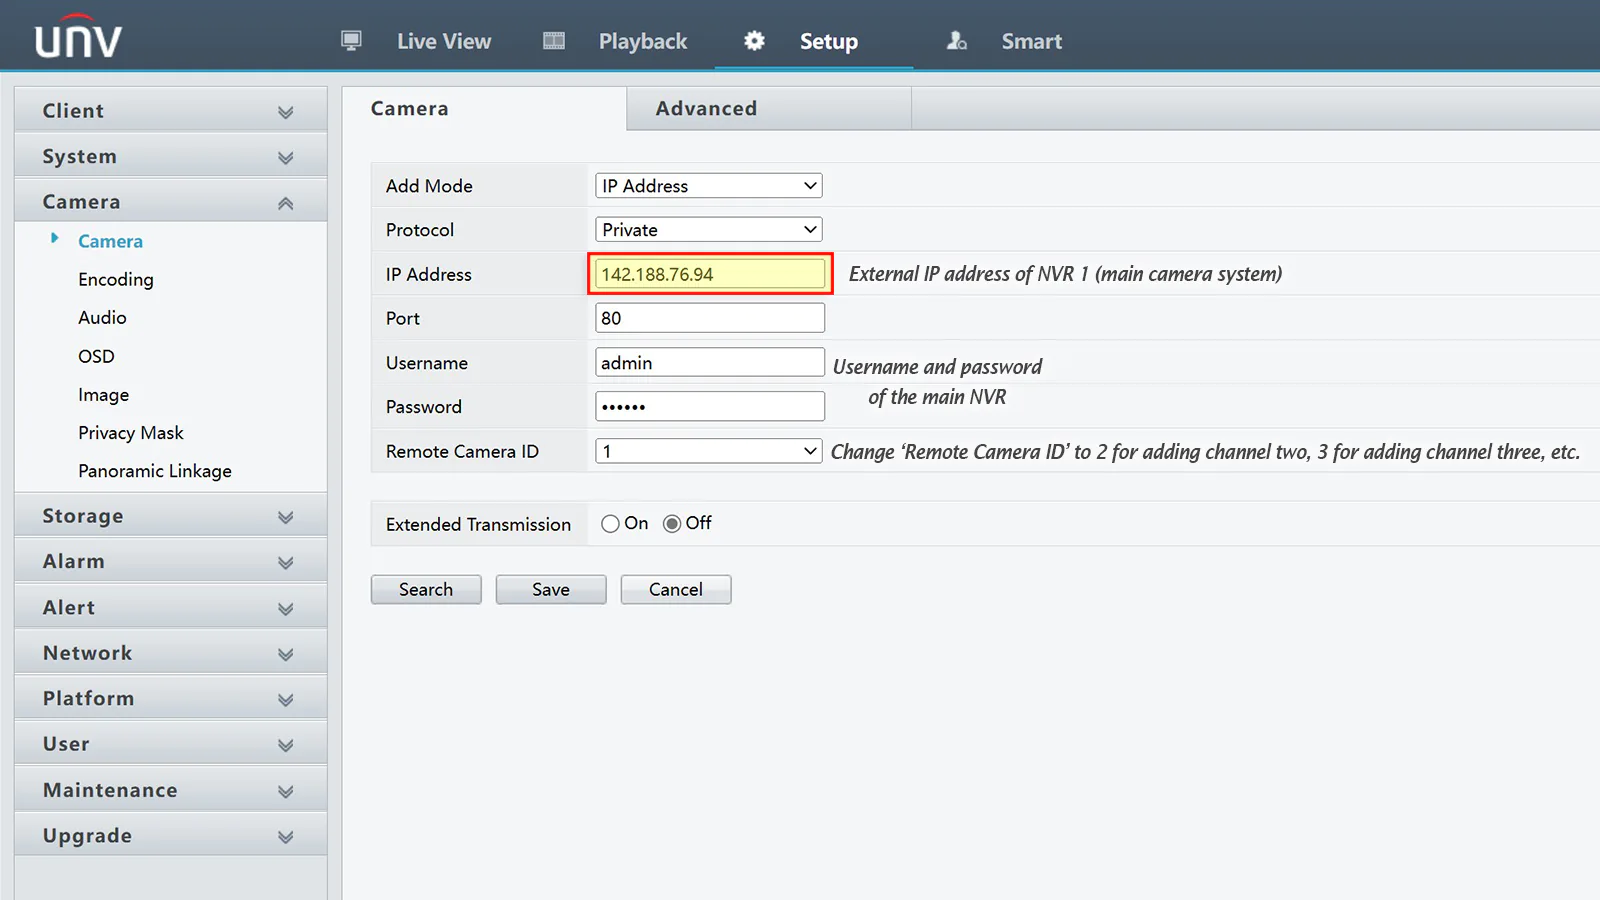
Adding cameras to Cloud NVR
- Navigate to the menu for adding cameras
- Add a camera by IP Address (use the external IP address of main camera system)
- Make sure the port is correct (default 80 for Uniview, 8000 for Hikvision, 37778 for Dahua)
- Ensure the username and password are correct
- Change the remote ID to 2 for camera 2, 3 for camera 3, etc.
- Repeat steps 2-5 until all cameras are added to the backup NVR
Step 4 – Optional: Setup a DDNS Server
At this point, you should have a fully functional cloud backup NVR. To recap:
- The main NVR is located wherever your cameras are (ie house, office, warehouse, etc.)
- The secondary NVR is located in a remote, safe location.
- The main NVR backs up footage to the secondary NVR through the internet
I’ve done this in the simplest way possible to show you how it works. However, if you have a dynamic IP address at your main NVR location – which is common in for many home and business internet users – the cloud backup may stop working after a few days!
The reason why it might stop working is simple: We’ve added the cameras using the external IP address however the IP address is not static – it’s dynamic. This means that after a few days or weeks it will change. When this happens, the cloud server will stop recording your cameras.
To solve this problem, you’ll need to setup a DDNS server on your router or NVR. A lot of NVRs include their own built-in DDNS server – Uniview has one called EZDDNS.
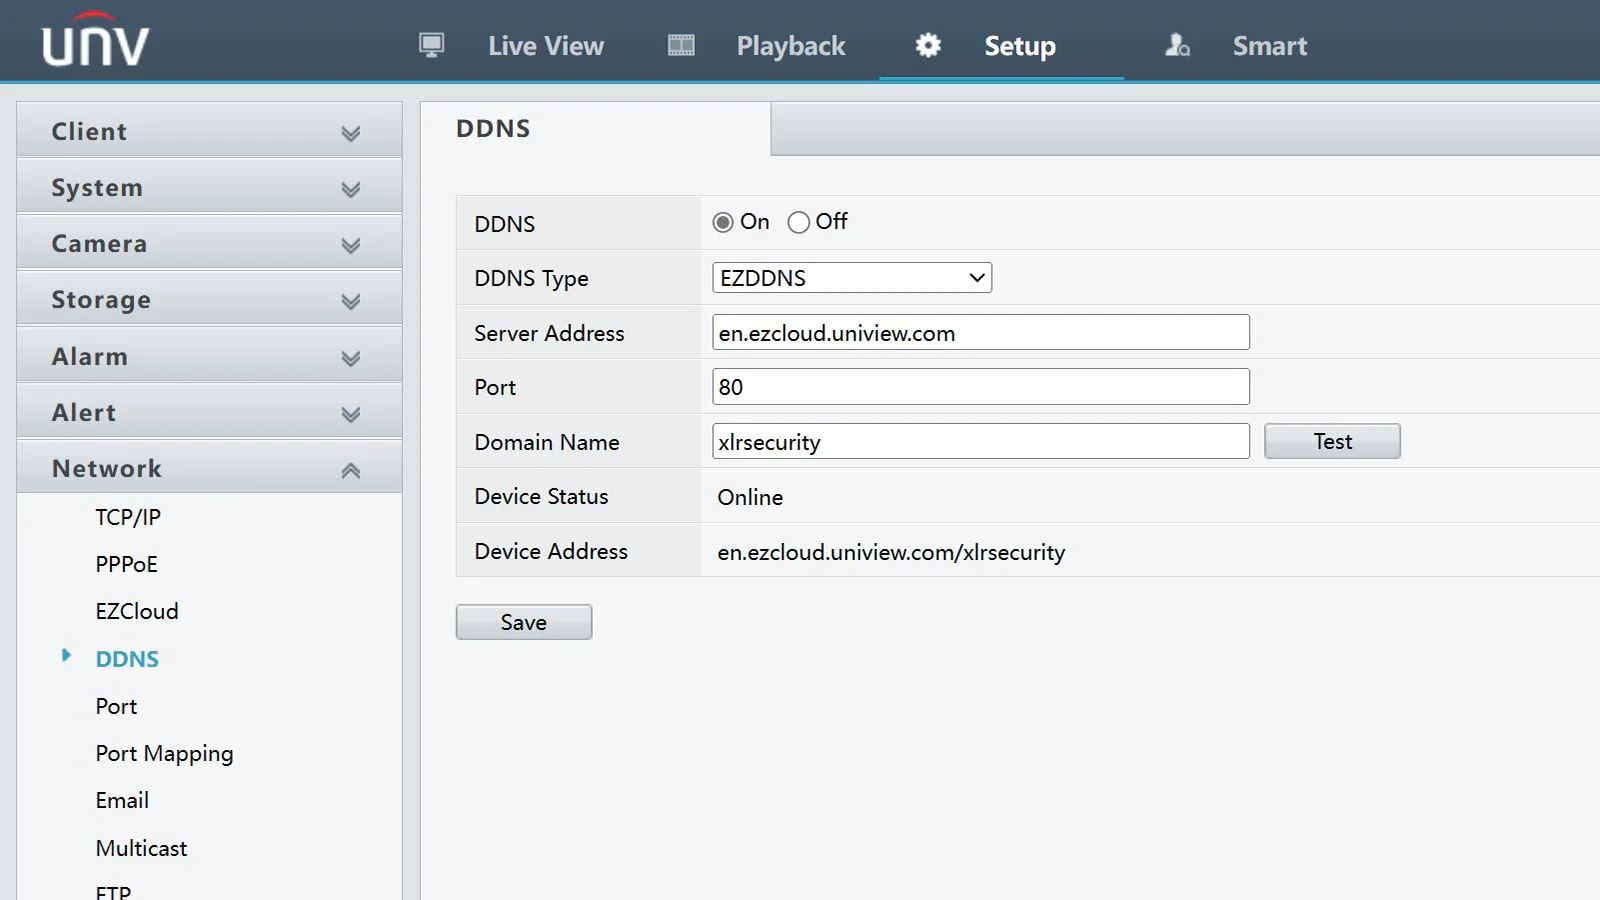
Since setting up DDNS is a whole separate topic, I won’t dive into it here. However, you can checkout the video below for further details on how to setup a DDNS server on your NVR.
Summary & Final Thoughts
This was a long article, so I appreciate your patience for making it this far. To summarize what we covered (and hopefully make it clear):
- Cloud backup is expensive – a better alternative is to host your own off-site backup
- You can create a pseudo cloud server by purchasing a second NVR and storing it in a safe, remote location. This location must have internet connection.
- Make you have ports forwarded on the main router – or setup a VPN tunnel.
- Configure the second NVR to backup the cameras by adding them via the external IP address.
- You can setup a DDNS server if you have a dynamic IP address so the backup server remains online even when your IP changes.
If you’d like to purchase a Uniview NVR as a secondary backup server, you can create an account with XLR Security. We ship to Canada and the United States, and we specialize in Uniview security cameras.